Esta entrada es la continuación de la anterior, Navigation Drawer – Android Design Support Library, en la cual vamos a añadir fragmentos, es decir, un Navigation Drawer con Fragments.
Hay que tener en cuenta que aquí solo se mostrará como añadir los fragmentos al tutorial anterior, es decir, solo cambian los 4 primeros puntos del tutorial anterior, el resto es idéntico.
Todo lo que has se va a mostrar en esta entrada también lo puedes seguir ver en el siguiente vídeo de abajo, sobretodo si tenéis problemas en como crear el segundo fragmento.
Contenidos
- Actividad MainActivity.java
- Layout activity_main.xml
- Fragment InboxFragment.java
- Layout fragment_inbox.xml
- Layout navigation_drawer_header.xml
- Menú navigation_drawer_menu.xml
- Archivos de estilos styles.xml para todas las versiones
- Colores mediante el archivo colors.xml
- Archivos de atributos attrs.xml para todas las versiones
- Drawables utilizados
- Segunda Actividad
Actividad MainActivity.java
Primero vamos a ver el archivo MainActivity.java al completo para ver los cambios respecto al tutorial anterior.
import android.content.Intent;
import android.os.Bundle;
import android.support.design.widget.NavigationView;
import android.support.v4.app.FragmentManager;
import android.support.v4.app.FragmentTransaction;
import android.support.v4.view.GravityCompat;
import android.support.v4.widget.DrawerLayout;
import android.support.v7.app.ActionBar;
import android.support.v7.app.AppCompatActivity;
import android.support.v7.widget.Toolbar;
import android.view.Menu;
import android.view.MenuItem;
import android.widget.Toast;

import com.videumcorp.desarrolladorandroid.navigationdrawerandroiddesignsupportlibraryandfragments.fragments.InboxFragment;
import com.videumcorp.desarrolladorandroid.navigationdrawerandroiddesignsupportlibraryandfragments.fragments.StarredFragment;

public class MainActivity extends AppCompatActivity {

    DrawerLayout drawerLayout;
    Toolbar toolbar;
    ActionBar actionBar;

    @Override
    protected void onCreate(Bundle savedInstanceState) {
        super.onCreate(savedInstanceState);
        setContentView(R.layout.activity_main);

        toolbar = (Toolbar) findViewById(R.id.toolbar);
        setSupportActionBar(toolbar);

        actionBar = getSupportActionBar();
        actionBar.setHomeAsUpIndicator(R.drawable.ic_menu_white_24dp);
        actionBar.setDisplayHomeAsUpEnabled(true);

        drawerLayout = (DrawerLayout) findViewById(R.id.navigation_drawer_layout);

        NavigationView navigationView = (NavigationView) findViewById(R.id.navigation_view);
        if (navigationView != null) {
            setupNavigationDrawerContent(navigationView);
        }

        setupNavigationDrawerContent(navigationView);

        //First start (Inbox Fragment)
        setFragment(0);

    }

    @Override
    public boolean onCreateOptionsMenu(Menu menu) {
        // Inflate the menu; this adds items to the action bar if it is present.
        getMenuInflater().inflate(R.menu.menu_main, menu);
        return true;
    }

    @Override
    public boolean onOptionsItemSelected(MenuItem item) {
        switch (item.getItemId()) {
            case android.R.id.home:
                drawerLayout.openDrawer(GravityCompat.START);
                return true;
        }
        return super.onOptionsItemSelected(item);
    }

    private void setupNavigationDrawerContent(NavigationView navigationView) {
        navigationView.setNavigationItemSelectedListener(
                new NavigationView.OnNavigationItemSelectedListener() {
                    @Override
                    public boolean onNavigationItemSelected(MenuItem menuItem) {
                        switch (menuItem.getItemId()) {
                            case R.id.item_navigation_drawer_inbox:
                                menuItem.setChecked(true);
                                setFragment(0);
                                drawerLayout.closeDrawer(GravityCompat.START);
                                return true;
                            case R.id.item_navigation_drawer_starred:
                                menuItem.setChecked(true);
                                setFragment(1);
                                drawerLayout.closeDrawer(GravityCompat.START);
                                return true;
                            case R.id.item_navigation_drawer_sent_mail:
                                menuItem.setChecked(true);
                                Toast.makeText(MainActivity.this, "Launching " + menuItem.getTitle().toString(), Toast.LENGTH_SHORT).show();
                                drawerLayout.closeDrawer(GravityCompat.START);
                                return true;
                            case R.id.item_navigation_drawer_drafts:
                                menuItem.setChecked(true);
                                Toast.makeText(MainActivity.this, "Launching " + menuItem.getTitle().toString(), Toast.LENGTH_SHORT).show();
                                drawerLayout.closeDrawer(GravityCompat.START);
                                return true;
                            case R.id.item_navigation_drawer_settings:
                                menuItem.setChecked(true);
                                Toast.makeText(MainActivity.this, "Launching " + menuItem.getTitle().toString(), Toast.LENGTH_SHORT).show();
                                drawerLayout.closeDrawer(GravityCompat.START);
                                Intent intent = new Intent(MainActivity.this, SettingsActivity.class);
                                startActivity(intent);
                                return true;
                            case R.id.item_navigation_drawer_help_and_feedback:
                                menuItem.setChecked(true);
                                Toast.makeText(MainActivity.this, menuItem.getTitle().toString(), Toast.LENGTH_SHORT).show();
                                drawerLayout.closeDrawer(GravityCompat.START);
                                return true;
                        }
                        return true;
                    }
                });
    }

    public void setFragment(int position) {
        FragmentManager fragmentManager;
        FragmentTransaction fragmentTransaction;
        switch (position) {
            case 0:
                fragmentManager = getSupportFragmentManager();
                fragmentTransaction = fragmentManager.beginTransaction();
                InboxFragment inboxFragment = new InboxFragment();
                fragmentTransaction.replace(R.id.fragment, inboxFragment);
                fragmentTransaction.commit();
                break;
            case 1:
                fragmentManager = getSupportFragmentManager();
                fragmentTransaction = fragmentManager.beginTransaction();
                StarredFragment starredFragment = new StarredFragment();
                fragmentTransaction.replace(R.id.fragment, starredFragment);
                fragmentTransaction.commit();
                break;
        }
    }
}
Los cambios que hay en este archivo al que había en el tutorial anterior son:
- Desaparece el
TextViewen mitad de la pantalla en el cual poníamos el nombre del elemento presionado en el Navigation Drawer. - Añadimos abajo del todo el método
setFragment. - Utilizamos dicho método para llamar a nuestros fragmentos dentro de
setupNavigationDrawerContent.
El método setFragment al combinarlo con el switch nos permitirá llamar a los fragmentos que usaremos en esta entrada (en mi caso solo dos, Inbox y Starred, ya que hacer más fragmentos sería simplemente repetir el mismo proceso lo cual es innecesario).
Los fragmentos funcionarán del siguiente modo, se creará un archivo java llamado InboxFragment.java, y un layout asociado al mismo, fragment_inbox.xml. Para crearlos es tan simple como hacer botón derecho con el ratón en sus respectivas carpetas, el java en la carpeta donde se encuentran los archivos java de las actividades, dándole a New y después a Java Class. El xml lo crearemos en la carpeta de los layout del mismo modo, pero esta vez seleccionamos layout resource file. También haremos otros para el elemento Starred del Navigation Drawer.
Estos archivos para explicarlo de un modo sencillo, “simularán” una actividad dentro de tu actividad principal. El xml dará la estética dentro del fragmento, en este ejemplo tendrá un botón y un texto y el java hará los cambios que nosotros queramos, y es que ese botón cambie el texto.
También hay que recordar que utilizamos el setFragment(0) al iniciarse la actividad para que muestre el fragmento de Inbox, ya que sino se quedaría completamente en blanco hasta que el usuario presionase el elemento Inbox en el Navigation Drawer.
Layout activity_main.xml
Cómo hemos hecho antes, vamos a ver el código al completo y lo vamos comparando:
<?xml version="1.0" encoding="utf-8"?>
<android.support.v4.widget.DrawerLayout xmlns:android="http://schemas.android.com/apk/res/android"
    xmlns:app="http://schemas.android.com/apk/res-auto"
    android:id="@+id/navigation_drawer_layout"
    android:layout_width="match_parent"
    android:layout_height="match_parent"
    android:fitsSystemWindows="@bool/fitsSystemWindows">

    <LinearLayout
        android:layout_width="match_parent"
        android:layout_height="wrap_content"
        android:orientation="vertical">

        <FrameLayout
            android:layout_width="match_parent"
            android:layout_height="@dimen/status_bar_kitkat_height"
            android:background="?colorPrimary"/>

        <FrameLayout
            android:layout_width="match_parent"
            android:layout_height="@dimen/status_bar_lollipop_height"
            android:background="?colorPrimaryDark"/>

    </LinearLayout>

    <FrameLayout
        android:layout_width="match_parent"
        android:layout_height="wrap_content"
        android:layout_marginTop="@dimen/status_bar_margin_top">

        <FrameLayout
            android:id="@+id/fragment"
            android:layout_width="match_parent"
            android:layout_height="match_parent"/>

        <android.support.v7.widget.Toolbar
            android:id="@+id/toolbar"
            android:layout_width="match_parent"
            android:layout_height="?actionBarSize"
            android:background="?attr/colorPrimary"
            android:elevation="4dp"
            app:popupTheme="@style/ThemeOverlay.AppCompat.Light"
            app:theme="@style/ToolbarTheme" />

    </FrameLayout>

    <android.support.design.widget.NavigationView
        android:id="@+id/navigation_view"
        android:layout_width="wrap_content"
        android:layout_height="match_parent"
        android:layout_gravity="start"
        android:fitsSystemWindows="@bool/fitsSystemWindows"
        app:headerLayout="@layout/navigation_drawer_header"
        app:menu="@menu/navigation_drawer_menu"
        app:theme="@style/NavigationViewTheme" />

</android.support.v4.widget.DrawerLayout>
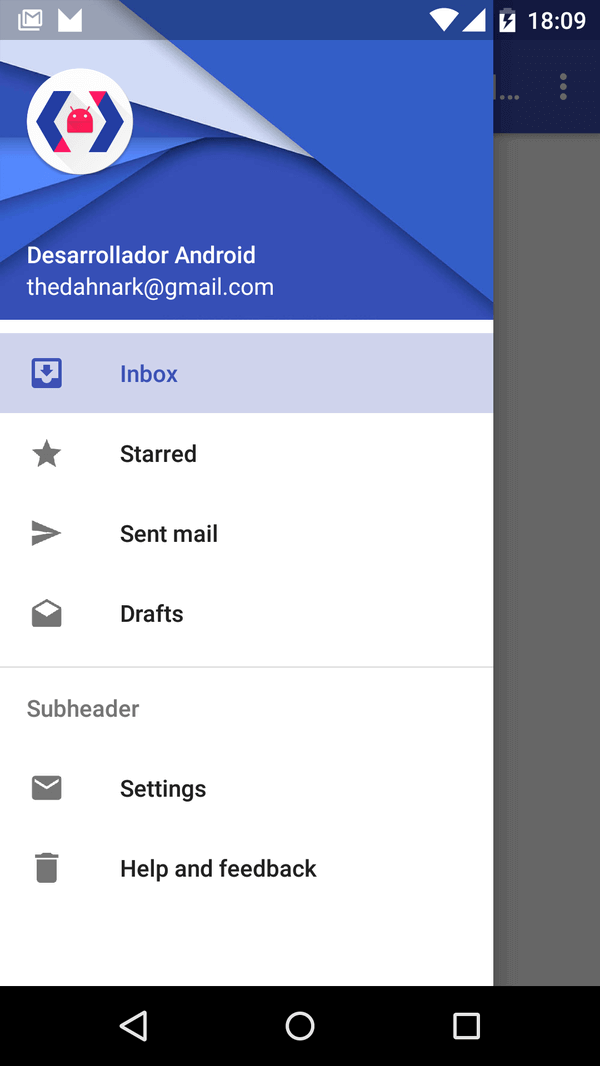
El único cambio aquí es que hemos eliminado el TextView para añadir lo que será nuestro fragmento, el FrameLayout de ID fragment. Cuando presionemos el botón Inbox en el Navigation Drawer, este FrameLayout será “sustituido” por el layout fragment_inbox.layout, mostrando tanto el botón como el texto que mencionamos en el apartado anterior.
Si se presionase Starred, en vez de reiniciar la actividad, simplemente se “sustituiría” otra vez dicho layout por el fragment_starred.xml. Un ejemplo claro de lo que ocurre en este tutorial, es lo que hace la app Gmail al ir presionando los elementos de su Navigation Drawer.
Fragment InboxFragment.java
Primero crea el archivo java, haz botón derecho con el ratón en la carpeta donde están los archivos java, selecciona New y después a Java Class.
Aquí es donde vamos a especificar que queremos que haga el botón dentro del fragmento, en mi caso simplemente cambiará el texto, tanto lo que pone como su color:
import android.os.Bundle;
import android.support.v4.app.Fragment;
import android.view.LayoutInflater;
import android.view.View;
import android.view.ViewGroup;
import android.widget.Button;
import android.widget.TextView;

import com.videumcorp.desarrolladorandroid.navigationdrawerandroiddesignsupportlibraryandfragments.MainActivity;
import com.videumcorp.desarrolladorandroid.navigationdrawerandroiddesignsupportlibraryandfragments.R;

public class InboxFragment extends Fragment {

    @Override
    public View onCreateView(LayoutInflater inflater, ViewGroup container, Bundle savedInstanceState) {

        // Inflate the layout for this fragment
        final View view = inflater.inflate(R.layout.fragment_inbox, container, false);

        ((MainActivity) getActivity()).getSupportActionBar().setTitle("Fragment Inbox");

        Button buttonChangeText = (Button) view.findViewById(R.id.buttonFragmentInbox);

        final TextView textViewInboxFragment = (TextView) view.findViewById(R.id.textViewInboxFragment);

        buttonChangeText.setOnClickListener(new View.OnClickListener() {
            @Override
            public void onClick(View v) {

                textViewInboxFragment.setText("This is the Inbox Fragment");
                textViewInboxFragment.setTextColor(getResources().getColor(R.color.md_yellow_800));

            }
        });

        return view;
    }

}
Como se puede ver, se le indica al fragmento que el layout que tiene que utilizar es el fragment_inbox, es decir, el fragment_inbox.xml que crearemos después de termianr con este archivo. Cuando crees el fragmento para la sección Starred, recuerda que tendrás que cambiar también este código dentro de StarredFragment.java para que asocie este java con fragment_starred.xml.
Presta atención que para llamar a la ActionBar o Toolbar de la actividad principal tienes que especificarlo, utilizando el (MainActivity) como se puede ver en la línea 21.
En la línea 24 podemos ver como se ha declarado el TextView como final, ya que sino, el IDE te dará un error al utilizarlo dentro del método onClick. En el resto de líneas destacadas, 31 y 32, se cambia el texto y el color del TextView al presionar el botón.
Layout fragment_inbox.xml
Crea el archivo xml, haz botón derecho con el ratón en la carpeta layout, selecciona New y después a layout resource file.
Este xml es muy básico y tiene poco que explicar. Simplemente es un RelativeLayout que contendrá nuestros dos elementos mencionados, un Button y un TextView.
<?xml version="1.0" encoding="utf-8"?>
<RelativeLayout xmlns:android="http://schemas.android.com/apk/res/android"
    android:layout_width="match_parent"
    android:layout_height="match_parent"
    android:orientation="vertical">

    <TextView
        android:layout_width="wrap_content"
        android:layout_height="wrap_content"
        android:textAppearance="?android:attr/textAppearanceLarge"
        android:text="Text inside fragment"
        android:id="@+id/textViewInboxFragment"
        android:layout_alignParentBottom="true"
        android:layout_centerHorizontal="true"
        android:layout_marginBottom="159dp" />

    <Button
        android:backgroundTint="@color/md_yellow_700"
        android:layout_width="wrap_content"
        android:layout_height="wrap_content"
        android:text="Button change text"
        android:id="@+id/buttonFragmentInbox"
        android:layout_centerVertical="true"
        android:layout_centerHorizontal="true" />
</RelativeLayout>
Esto mismo que hemos hecho, lo repetiríamos otra vez, creando otro archivo java y otro xml para el fragmento Starred, y cambiando todo lo que hacía referencia a Inbox por los nuevos archivos de Starred.
De aquí en adelante todo el tutorial es igual que lo que se vio en la entrada anterior.
Archivos de estilos styles.xml para todas las versiones
Aquí básicamente tenemos los elementos necesarios para dar los colores y el formato necesario para todas las versiones. El arreglo que mencioné anteriormente de que es necesario que el Navigation Drawer muestre los elementos con la letra Roboto Medium en vez de Roboto Regular es el siguiente:
<style name="NavigationViewTheme" parent="AppTheme">
        <item name="textAppearanceListItem">@style/TextAppearance.AppCompat.Body2</item>
    </style>
Como se puede ver, en la v19 le indicamos que la status bar sea translucida y en la v21 que sea transparente además del otro atributo para que en el navigation drawer se muestre el header debajo de la status bar. Como veis, aunque le decimos que la barra tiene que ser transparente en la v21, la librería ya se encarga de añadir el translucido cuando el navigation drawer se abre.
<?xml version="1.0" encoding="utf-8"?>
<resources>

    <style name="AppTheme" parent="Base.AppTheme">

    </style>

    <style name="Base.AppTheme" parent="Theme.AppCompat.Light.NoActionBar">
        <item name="colorPrimary">@color/md_indigo_500</item>
        <item name="colorPrimaryDark">@color/md_indigo_700</item>
        <item name="colorAccent">@color/md_pink_500</item>
        <item name="colorControlHighlight">@color/md_indigo_500_25</item>
        <item name="android:windowBackground">@color/md_white_1000</item>
    </style>

    <style name="ToolbarTheme" parent="AppTheme">
        <item name="android:textColorPrimary">@android:color/white</item>
        <item name="android:textColorSecondary">@android:color/white</item>
    </style>

    <style name="NavigationViewTheme" parent="AppTheme">
        <item name="textAppearanceListItem">@style/TextAppearance.AppCompat.Body2</item>
    </style>

</resources>
<?xml version="1.0" encoding="utf-8"?>
<resources>

    <style name="AppTheme" parent="Base.AppTheme">
        <item name="android:windowTranslucentStatus">true</item>
    </style>

</resources>
<?xml version="1.0" encoding="utf-8"?>
<resources>

    <style name="AppTheme" parent="Base.AppTheme">
        <item name="android:windowDrawsSystemBarBackgrounds">true</item>
        <item name="android:statusBarColor">@android:color/transparent</item>
    </style>

</resources>
Colores mediante el archivo colors.xml
Los colores utilizados los puedes añadir tanto de mi GitHub como visitando esta página sobre Color en Material Design. Simplemente crea un archivo colors.xml en app/res/values/colors.xml.
Los strings son los que se crean por defecto al ir creando cada uno de los elementos.
<resources>
    <string name="app_name">Navigation Drawer</string>
    <string name="hello_world">Hello world!</string>
    <string name="action_settings">Settings</string>
    <string name="title_activity_settings">Settings</string>
</resources>
Archivos de atributos attrs.xml para todas las versiones
Estos archivos son para arreglar lo que hemos ido mencionando a lo largo de la entrada:
- Para que Navigation Drawer se vea bien en Kitkat
- Para que el avatar del header se vea bien en versiones de Android con barra translucida y negra.
<?xml version="1.0" encoding="utf-8"?>
<resources>
    <bool name="fitsSystemWindows">true</bool>
    <dimen name="navigation_drawer_header_margin">16dp</dimen>
    <dimen name="status_bar_height">0dp</dimen>
</resources>
<?xml version="1.0" encoding="utf-8"?>
<resources>
    <bool name="fitsSystemWindows">false</bool>
    <dimen name="navigation_drawer_header_margin">41dp</dimen>
    <dimen name="status_bar_height">25dp</dimen>
</resources>
<?xml version="1.0" encoding="utf-8"?>
<resources>
    <bool name="fitsSystemWindows">true</bool>
    <dimen name="navigation_drawer_header_margin">41dp</dimen>
    <dimen name="status_bar_height">0dp</dimen>
</resources>
Drawables utilizados
Los drawables utilizados los puedes encontrar en la siguiente carpeta de GitHub.
Además, recomiendo visitar las siguientes páginas para obtener más recursos:
Segunda Actividad
Cómo se ha dicho, el elemento del navigation drawer Settings, inicia una segunda actividad, por lo que es necesario crearla, aunque no tiene nada de especial, simplemente os dejo aquí los cambios que he añadido al SettingsActivity.java y al activity_settings.xml, ya que el archivo menu_settings no ha sido modificado.
import android.os.Build;
import android.support.v7.app.AppCompatActivity;
import android.os.Bundle;
import android.support.v7.widget.Toolbar;
import android.util.TypedValue;
import android.view.Menu;
import android.view.MenuItem;

public class SettingsActivity extends AppCompatActivity {

    Toolbar toolbar;

    @Override
    protected void onCreate(Bundle savedInstanceState) {
        super.onCreate(savedInstanceState);
        setContentView(R.layout.activity_settings);

        toolbar = (Toolbar) findViewById(R.id.toolbar);
        setSupportActionBar(toolbar);
        getSupportActionBar().setDisplayHomeAsUpEnabled(true);

        TypedValue typedValueColorPrimaryDark = new TypedValue();
        SettingsActivity.this.getTheme().resolveAttribute(R.attr.colorPrimaryDark, typedValueColorPrimaryDark, true);
        final int colorPrimaryDark = typedValueColorPrimaryDark.data;
        if (Build.VERSION.SDK_INT >= 21) {
            getWindow().setStatusBarColor(colorPrimaryDark);
        }
    }

    @Override
    public boolean onCreateOptionsMenu(Menu menu) {
        // Inflate the menu; this adds items to the action bar if it is present.
        getMenuInflater().inflate(R.menu.menu_inbox, menu);
        return true;
    }

    @Override
    public boolean onOptionsItemSelected(MenuItem item) {
        // Handle action bar item clicks here. The action bar will
        // automatically handle clicks on the Home/Up button, so long
        // as you specify a parent activity in AndroidManifest.xml.
        int id = item.getItemId();

        //noinspection SimplifiableIfStatement
        if (id == R.id.action_settings) {
            return true;
        }

        return super.onOptionsItemSelected(item);
    }
}
<FrameLayout xmlns:android="http://schemas.android.com/apk/res/android"
    xmlns:app="http://schemas.android.com/apk/res-auto"
    android:layout_width="match_parent"
    android:layout_height="match_parent">

    <android.support.v7.widget.Toolbar
        android:id="@+id/toolbar"
        android:layout_width="match_parent"
        android:layout_height="?actionBarSize"
        android:background="?attr/colorPrimary"
        android:elevation="4dp"
        app:popupTheme="@style/ThemeOverlay.AppCompat.Light"
        app:theme="@style/ToolbarTheme" />

    <TextView
        android:textAppearance="@style/TextAppearance.AppCompat.Display1"
        android:layout_width="wrap_content"
        android:layout_height="wrap_content"
        android:layout_gravity="center"
        android:text="Settings"
        android:textColor="@color/md_text" />

</FrameLayout>
Y ya está todo listo, tu navigation drawer debería funcionar correctamente si lo ejecutas.
Puedes ver más información sobre Navigation Drawer en la página oficial de Google en inglés pulsando aquí.